Dynamics Search Engine

Friday, August 15, 2014

How to execute parallel compilation command on server side using AxBuild.exe for Microsoft Dynamics AX 2012 CU7 onwards

How to execute parallel compilation command on server side using AxBuild.exe for Microsoft Dynamics AX 2012 CU7 onwards

Overview:
The AxBuild.exe utility program enables you to accomplish a full compile of all the X++ code on your system much faster than you can with the MorphX client (native way). AxBuild.exe is run at a command prompt on a computer that hosts the Application Object Server (AOS). This approach eliminates the burden of transferring metadata between the AOS machine and the client machine. It starts several parallel processes and divides pieces of the full compile among them. Each piece is called worker. One set of workers generates 6 worker windows. It depends on the system that how many set of workers system will generate to make compilation faster.

AxBuild.exe is available in Microsoft Dynamics AX 2012 R3 or AX 2012 R2 + cumulative update 7 or later.

How to do it:
Step1: Log on to your AOS server for which you want to start the compilation.

Step2: On AOS server go to Start on task bar and compose cmd in Run to open command prompt.

Step3: Go to the bin folder of your AOS application. By default it should be “C:\Program Files\Microsoft Dynamics AX\60\Server\\bin\”. In this folder you will get AxBuild.exe executable file. Make sure the file is existing here. Note that the folder path can be different based on your installation.

<!--[if gte vml 1]>


Step4: Now you need to compose and execute the command. The command is AxBuild.exe xppCompileAll /s=01 “C:\Program files (x86)\Microsoft Dynamics AX\60\Client\Bin”. First parameter is to compile the application in whole, scond parameter is to consider the service number from AOS server. You may have more than one service on your AOS server. Third parameter is referring client bin folder if anything to be considered from there. The command window looks like:

<!--[if gte vml 1]>


Step5: Execute the command by pressing Enter key of your key board.

<!--[if gte vml 1]>


Once compilation is over it shows the details like when completed, how much time it took, log file location, number of workers completed the compilation etc.
Dynamics AX R2 was taking 4.5 hours to complete application compilation with native way but new way of compilation using AxBuild.exe only takes few minutes, not even an hour. It may take more than one hour if there are 6 workers.

You may leave your comments below.

Thursday, May 8, 2014

Microsoft Dynamics AX 2012 Database Entity Relationship Diagrams

Hello,

After a long time I got a chance to write here.
I was surfing internet and came out with a very useful link http://www.microsoft.com/dynamics/ax/erd/ax2012r2/ which tells about Microsoft Dynamics AX 2012 Database Entity Relationship Diagrams.

This link can answers your questions like:
How to know Microsoft Dynamics AX 2012 table relations?
In Microsoft dynamics AX 2012 how to know tables per module?
In Microsoft dynamics AX 2012 how to know parent child relationship for tables?

You can explore the content by Module.
This link is very useful for AX developers as well as functional people who are interested to know about Microsoft dynamics AX 2012 table relationship.


You may leave your comments below.
 

Friday, April 11, 2014

How to fix synchronization error ‘Cannot create a record in Version control changes (SysVersionControlTmpChange)’ with TFS while importing?

How to fix synchronization error ‘Cannot create a record in Version control changes (SysVersionControlTmpChange)’ with TFS while importing?

Applied on: Dynamics AX 2012 R2
Prerequisite: Basic Dynamics AX 2012 programming knowledge & basic knowledge of how to use Team Foundation Server (TFS).
Target audience: AX programmers
Assumption: You are familiar with Dynamics AX 2012, TFS and Visual Studio .Net

 
Symptom:

1)     When you try to synchronize a model with Team Foundation Server (TFS), it throws error like “Cannot create a record in Version control changes (SysVersionControlTmpChange). Change Number: [a numeric number]. The record already exists.”

 
2)     You try to synchronize an object with TFS and system throws errors “Cannot create a record in Version control changes (SysVersionControlTmpChange). Change Number: [a numeric number]. The record already exists.”

 
A sample error.

 
I was facing the above error and came up with a solution as below.

The above screenshot shows a RecID “5637527359”. I searched for this RecID in SysVersionControlSynchronizeLog table record and got the record, noticed that ItemPath field of this searched record shows a value where I can see AOT path for a view called DirPartyPostalAddressView.

Then I searched SysVersionControlSynchronizeLog table for view DirPartyPostalAddressView using ItemPath field as shown below.


It shows two entries (record) for DirPartyPostalAddressView in the searched result. Here system has two entries for DirPartyPostalAddressView so during TFS synchronization it tries to create two entries to table SysVersionControlTmpChange and this table does not allow more than one entry for the same object. During 2nd entry for DirPartyPostalAddressView to SysVersionControlTmpChange, system throws error “The record already exists.”

Now I have the visibility to which object the problem is associated with. So I opened the AOT and went to view DirPartyPostalAddressView, compiled it and synchronized it with TFS. On synchronization it throws same error. Then I started looking to the customization done for this objects and came out with a conclusion that some incorrect customization was there. I fixed it and it was working perfectly.

Hope this piece of information will be useful for you.
You may write your comments below.

Tuesday, February 25, 2014

How to resolve CIL problem when it says Cannot create a record in SysXppAssembly (SysXppAssembly). The record already exists.

How to resolve CIL problem when it says Cannot create a record in SysXppAssembly (SysXppAssembly). The record already exists.

Sometimes you try to general incremental CIL or full CIL and receive error like "Cannot create a record in SysXppAssembly (SysXppAssembly). The record already exists." as shown below.


How to get out of this error?

The solution is simple. You need to restart the AOS.

Applied on: Dynamics AX 2012 R2
Prerequisite: Basic Dynamics AX 2012 knowledge

Target audience: AX programmers
Assumption: You are familiar with Dynamics AX 2012

Hope this was useful. You may leave your comments below.


Friday, February 21, 2014

How to resolve error Disconnected from the AOS for Microsoft Dynamics AX 2012 and Visual Studio .Net

Why you get error "Disconnected from the AOS" when you open Visual Studio and try to see Application Explorer tool box to customize something for Microsoft Dynamics AX Enterprise Portal or SSRS Reports?


Reason:

The Visual Studio instance you open does not refer the configuration which is configured. Such error you will encounter when you have different client and AOS system. For example; Server 1 is having Application Object Server (AOS) and System 1 is having AX client so you have AX client and server on different machines. Other way your Visual Studio instance is not connected to target Microsoft Dynamics AX AOS configuration.

Applied on: Dynamics AX 2012 R2

Prerequisite: Basic Dynamics AX 2012 knowledge
Target audience: AX programmers
Assumption: You are familiar with Dynamics AX 2012 and Visual Studio .Net


Solution:
Option 1: You should have AX client and server on the same machine. In general development server with multi users is not configured with single machine based.

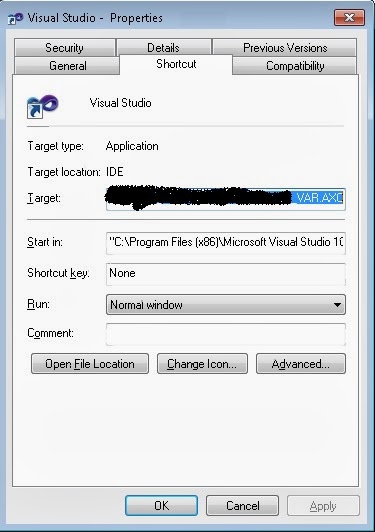
Option 2: If your AX client and server are on different machines, you need to launch your Visual Studio instance using a shortcut from AX client machine and that shortcut should have target AOS configuration. E.g. You have an AX configuration file called VAR_DEV.AXC to launch the correct AOS. Get a shortcut of your Visual Studio on AX client machine right click on it. You will see the property dialog as shown below.


You will see the Visual Studio instance common IDE path [see above]. This is the default path. The depends based on installation.

The Target field should have path "C:\Program Files (x86)\Microsoft Visual Studio 10.0\Common7\IDE\devenv.exe". This is the default path.

The action you need to perform is to add target for AOS configuration file to it. To achieve this replace the path with "C:\Program Files (x86)\Microsoft Visual Studio 10.0\Common7\IDE\devenv.exe" /AXConfig \\[File location]\DEV04_VAR.AXC


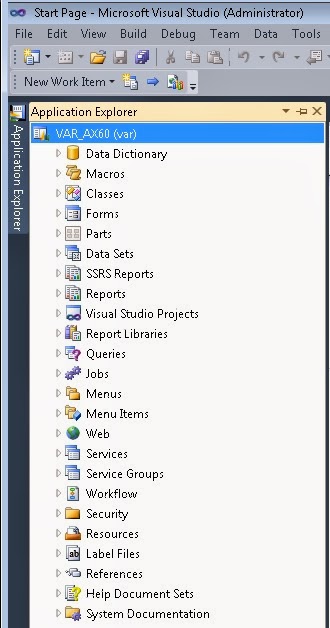
After modifying this value click on Apply button. Now you launch your Visual Studio by double clicking this Visual Studio Icon. It will allow you to see AOT objects as shown below.


Option 3: On AX client machine configuration utility you can upload configuration file DEV04_VAR.AXC. To do this, open Microsoft Dynamics AX 2012 Configuration Utility from Administrative Tools. Click on Manage button then Set Configuration Stone.


Click on Apply button then OK.

Now you can launch your Visual Studio on AX client machine from Start button > All Programs > Microsoft Visual Studio 2010 folder > Microsoft Visual Studio 2010.


Hope this was useful for you. You may leave your comments below.


Wednesday, February 19, 2014

How to call an AIF Service operation and send data outside Microsoft Dynamics AX 2012 using X++ code


Sometimes it happens like you developed an AIF Service in Microsoft Dynamics AX and not able to test. Reason can be anything. Consider a scenario where you need to send AX data outside using standard AIF services but don’t know how to send.
This article explains you how to run a read operation for an AIF Service to send data from Microsoft Dynamics AX to your destination folder using File System Adapter. This article may answer below questions:

Using X++ codes how to call a service operation for Microsoft Dynamics AX 2012 AIF?
How to call or execute read operation in Microsoft Dynamics AX 2012?
How to send data outside Microsoft Dynamics AX 2012 using Outbound?

How to use standard Microsoft Dynamics AX 2012 AIF Services?

Applied on: Dynamics AX 2012 R2
Prerequisite: X++; MorphX; Basic programming knowledge, Basic AIF
Target audience: AX programmers
Assumption: Outbound port is configured properly. The person has the basic idea about AIF.

Here I used a standard service call VendVendTableService and read operation of it to send Vendor data outside.

Below job is to select a vendor record and send to Queue Manager.

 
static void aifOutBoundServiceCall(Args _args)
{
    AxdSendContext      axdSendContext  = AxdSendContext::construct();
    AifEntityKey        aifEntityKey    = AifEntityKey::construct();
    Map                 keyData;
    AifConstraintList   aifConstraintList   = new AifConstraintList();
    AifConstraint       aifConstraint       = new AifConstraint();
    VendTable           vendTable;

    select firstOnly vendTable
        where vendTable.AccountNum == "‪‪V-1001";

    keyData = SysDictTable::getKeyData(vendTable);
    aifEntityKey.parmTableId(vendTable.TableId);
    aifEntityKey.parmRecId(vendTable.RecId);
    aifEntityKey.parmKeyDataMap(keyData);

    axdSendContext.parmXMLDocPurpose(XMLDocPurpose::Original);
    axdSendContext.parmSecurity(false);
    aifConstraint.parmType(AifConstraintType::NoConstraint) ;
    aifConstraintList.addConstraint(aifConstraint) ;


//To handle an error it can be checked if outbound port is configured. This is optional.
    AifSendService::submitDefault(  classnum(VendVendTableService),
                                    aifEntityKey,
                                    aifConstraintList,
                                    AifSendMode::Async,
                                    axdSendContext.pack());

}
 

Below logic can be used to check whether Outbound port is configure or not properly. It’s not mandatory but nice to have.
boolean canSendXML()
{
    boolean             ret;
    AifActionId         actionId;
    AifEndpointList     endpointList;
    AifConstraint       aifConstraint = new AifConstraint();
    AifConstraintList   aifConstraintList = new AifConstraintList();

    actionId = AifSendService::getDefaultSendAction(classnum(VendVendTableService), AifSendActionType::SendByKey);


    if (actionId)
    {
        aifConstraint.parmType(AifConstraintType::NoConstraint);
        aifConstraintList.addConstraint(aifConstraint);
 
        endpointList = AifSendService::getEligibleEndpoints(actionId, aifConstraintList);
 
        if (endpointList.getEndpointCount()>0)
        {
            ret = true;
        }
    }

    return ret;
}

 
To release data from Queue Manager below job can be executed.

static void aifOutboundExecutoinJob()
{
    new AifOutboundProcessingService().run();
    new AifGatewaySendService().run();
}


After execution of above job below is the output.
 

In Microsoft Dynamics AX, how to get a look up of all the tables available in AOT


This article explains you how to get a look up to a control for All the AOT tables and can answer to below relevant questions.
·  Create a look up to show all the tables from AOT.
·  How to develop a drop down to show all the AOT tables where user can select one among?
·  How to create an edit method in Microsoft Dynamics AX?


Applied on: Dynamics AX 2012 R2
Prerequisite: X++; MorphX; Basic programming knowledge
Target audience: Any


Output: Look up of all the AOT tables
  

Create a table with a single field. Here my table name is TableLookUp with field name TableObjID.
The field should be extended to RefTableId EDT as shown below.


Write an edit method to your table. I wrote a method in the name of tableObject2Name. The method looks like:


// This method returns table name
// BP deviation documented
edit TableName tableObject2Name(boolean _set, TableName _name) // System Documentation>Type>TableName
{
    Dictionary  dictionary;
    TableId     tableID;

    if (_set)
    {
        dictionary = new Dictionary();  // System Documentation>Classes>Dictionary
        tableID = dictionary.tableName2Id(_name);

        if (tableID)
        {
            this.TableObjID = tableID;
        }
    }
    return tableid2name(this.TableObjID);
}

 
Create a new form and use the table you created as data sources and method to get a control.
Here my form looks like:
 

<>