Dynamics Search Engine

Showing posts with label Ax Enterprise Portal. Show all posts

Friday, February 21, 2014

How to resolve error Disconnected from the AOS for Microsoft Dynamics AX 2012 and Visual Studio .Net

Why you get error "Disconnected from the AOS" when you open Visual Studio and try to see Application Explorer tool box to customize something for Microsoft Dynamics AX Enterprise Portal or SSRS Reports?


Reason:

The Visual Studio instance you open does not refer the configuration which is configured. Such error you will encounter when you have different client and AOS system. For example; Server 1 is having Application Object Server (AOS) and System 1 is having AX client so you have AX client and server on different machines. Other way your Visual Studio instance is not connected to target Microsoft Dynamics AX AOS configuration.

Applied on: Dynamics AX 2012 R2

Prerequisite: Basic Dynamics AX 2012 knowledge
Target audience: AX programmers
Assumption: You are familiar with Dynamics AX 2012 and Visual Studio .Net


Solution:
Option 1: You should have AX client and server on the same machine. In general development server with multi users is not configured with single machine based.

Option 2: If your AX client and server are on different machines, you need to launch your Visual Studio instance using a shortcut from AX client machine and that shortcut should have target AOS configuration. E.g. You have an AX configuration file called VAR_DEV.AXC to launch the correct AOS. Get a shortcut of your Visual Studio on AX client machine right click on it. You will see the property dialog as shown below.


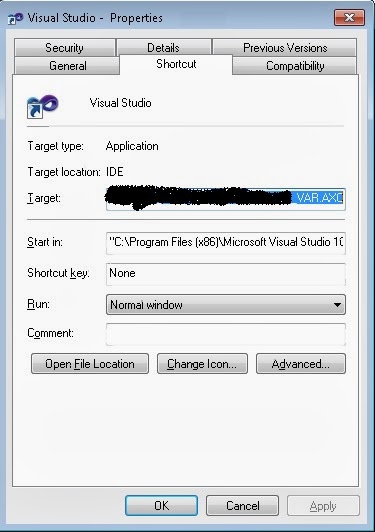
You will see the Visual Studio instance common IDE path [see above]. This is the default path. The depends based on installation.

The Target field should have path "C:\Program Files (x86)\Microsoft Visual Studio 10.0\Common7\IDE\devenv.exe". This is the default path.

The action you need to perform is to add target for AOS configuration file to it. To achieve this replace the path with "C:\Program Files (x86)\Microsoft Visual Studio 10.0\Common7\IDE\devenv.exe" /AXConfig \\[File location]\DEV04_VAR.AXC


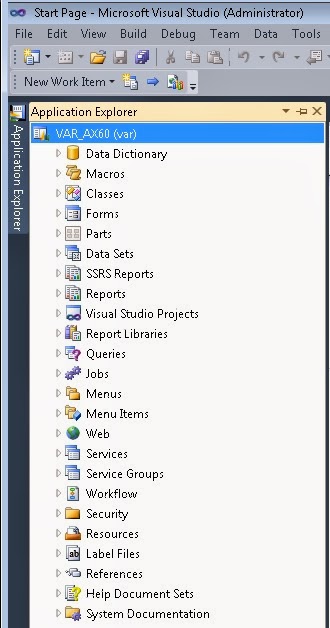
After modifying this value click on Apply button. Now you launch your Visual Studio by double clicking this Visual Studio Icon. It will allow you to see AOT objects as shown below.


Option 3: On AX client machine configuration utility you can upload configuration file DEV04_VAR.AXC. To do this, open Microsoft Dynamics AX 2012 Configuration Utility from Administrative Tools. Click on Manage button then Set Configuration Stone.


Click on Apply button then OK.

Now you can launch your Visual Studio on AX client machine from Start button > All Programs > Microsoft Visual Studio 2010 folder > Microsoft Visual Studio 2010.


Hope this was useful for you. You may leave your comments below.


Monday, September 21, 2009

Microsoft Dynamics Ax 2009 web project template is not available / visible in visual studio 2008


This article explains
How to make available Microsoft Dynamics Ax Web Project template for all users.
How to resolve Microsoft Dynamics Ax Web Project template missing issue / problem.
How to resolve Microsoft Dynamics Ax Web Project template visible or availability issue even through Ax EP development tool is installed.


Symptom:
One user can see Dynamics Ax Web Project template when he/she creates a new web project but the other user can’t see it on the same server.

Reason:
If a user can see Microsoft Dynamics Ax Web Project template it’s because in his/her profile on system the template is available. In general the template is located on a windows 2003 server at C:\Documents and Settings\[user id ]\My Documents\Visual Studio 2008\Templates\ProjectTemplates\Visual Web Developer\CSharp\ AxWebProject.zip

Resolution:
To make Microsoft Dynamics Ax Web Project template available for other users copy the Templates folder from the user who can see template and paste it to other users’ profile It assumed that your templates are available in the default located as mentioned in above path

Step1:
Go to C:\Documents and Settings\[user id ]\My Documents\Visual Studio 2008\

Step2:
Copy Templates folder

Step3:
Open the other users’ profile and go to C:\Documents and Settings\[user id ]\My Documents\Visual Studio 2008\

Step4:
Paste the Templates folder. If system says to overwrite it click on yes option.


NOTE: Use at your own risk. There is no warranty on this article.

Thursday, February 26, 2009

How to debug x++ code for Microsoft Dynamics AX Enterprise Portal

Note: There is no warranty on this article. Use at your own risk.
I have done this on a single system.


This article explains:

  • How to debug X++ code for Microsoft Dynamics Ax 2009 Enterprise Portal
  • How to debug X++ code using .Net Business Connector
  • How to setup and configure to debug X++ code for Microsoft Dynamics Ax 2009 Enterprise Portal
  • How to debug Microsoft Dynamics Ax 2009 Enterprise Portal (EP)
1.
Log in to the server that is running the AOS.


2.
Open the Microsoft Dynamics AX Server Configuration utility. To open Start > Control Panel > Administrative Tools > Microsoft Dynamics AX 2009 Server Configuration.

3.
Create a new configuration that allows debugging.


3.a.

Click Manage then Create configuration. Give a name to the new configuration in the Create Configuration window then click OK.


3.b.
On the Application Object Server tab, select Enable breakpoints to debug code X++ code running on this server. Click on Apply button.


4.
Click on OK button to close the configuration window. You will get a message that indicates AOS is going to be restarted.

5.
Actually debugger works on the server where IIS is running and Enterprise Portal is hosted. I used a single system and all the things are on the same system. If you are accessing a system remotely using Terminal Services then from the Start menu click Run. Type
mstsc /console in the Open text box and click OK
This opens a console session in Terminal Services. Console session is required to debug Ax EP

6.
The World Wide Web Publish Service should be enabled.
6.a.
Open the Services window for the system. To open it Start > Control Panel > Administrative Tools > Services.
6.b.
Right-click the World Wide Web Publishing Service and click Properties.


6.c.
Click the Log On tab.
6.d.
Select Allow service to interact with desktop as shown below.


6.e.
Click on OK button to close the properties window.

7.
Open the web.config file located in :\Inetpub\wwwroot\wss\VirtualDirectories\\, here the port number of the Enterprise Portal site. If you forgot the port then there is a way to check it out. Open Ax client then Administration main menu > Setup > Internet > Enterprise Portal > Web sites, here you can see the port.


8.
Now do the following:
8.a.
Find out the compilation element then set the debug attribute to true.
8.b.
Save the changes.

9.
Reset IIS by typing the iisreset command at the command-line window or type iisreset in Start > Run > Open text box then click on OK button.

10.
Open the Microsoft Dynamics AX Configuration utility. To open it Start > Control Panel > Administrative Tools > Microsoft Dynamics AX 2009 Configuration.

11.
Set the Application Object Server Instance drop-down menu to Business Connector (non-interactive use only).


12.
Create a new configuration to allow debugging.
12.a.
Click on Manage button then click Create configuration. In the Create Configuration window, name the new configuration then click OK button.
12.b.
On the Developer tab, select Enable user breakpoints to debug code in the Business Connector and Enable global breakpoints to debug code running in the Business Connector or client then click on Apply button.

13.
Click on OK button to close the configuration window.

14.
Open the Microsoft Dynamics AX client.

15.
On the Tools menu, click Options to display the Options window.

16.
On the Development tab, select When Breakpoint from the Debug mode list box, and then click Apply. This enables debugging mode on the client.


17.
Close the Options window.

18.
Open the Microsoft Dynamics AX client.

19.
Now decide the element you want to debug. Lets say you want to debug a class method. Open the method in code editor and write breakpoints where you want to set a breakpoint.

20.
Open the Debugger window manually. To open debugger manually click on Tools > Development Tools > Debugger.

21.
Now execute the web form where the method has been invoked. It should work. On my system it is working perfectly.


If there is any problem please let me know. Definitely I will help you.

Saturday, February 14, 2009

How to use User Controls within .Net to develop or customize Microsoft Dynamics Ax 2009 Enterprise Portal -Part I

Note: There is no warranty on this article. Use at your own risk.

This article explains how to develop or customize Microsoft Dynamics Ax 2009 Enterprise Portal using User Control. How to use Visual Studio (.Net) environment to develop/customize Microsoft Dynamics Ax 2009 Enterprise Portal. How to use Microsoft Dynamics Ax 2009 Data Sets within .Net environment. How to develop or customize Dynamics Ax 2009 Enterprise Portal.

To follow this article you should have installed:
  1. Microsoft Dynamics Ax 2009 with Enterprise Portal
  2. Enterprise Portal should be configured with Microsoft Windows Sharepoint Services 3.0 SP1 or Microsoft Windows Sharepoint Server 2007 SP1. A website for Enterprise Portal should be created
  3. Visual Studio 2008.
You should be familiar with
  • X++ Language
  • Microsoft Dynamics Ax 2009 customization
  • .Net development
  • Microsoft Windows Sharepoint Services product
Now I will explain step by step.

1. Open Microsoft Dynamics Ax 2009 application then AOT. Select Data Sets node, right click on it, and select New Data Set.


2. Rename it to SalesInfo (or any other name whatever you wish) as shown below:


3. Add SalesTable and CustTable to the Data Sources of SalesInfo Data Set as shown below. Make a join between these table.


4. Now open your Visual Studio, click on File->New->Web Site… as shown below


5. From web site template select Dynamics Ax Web Project template, Location should be File System, Language should be Visual C#, and .Net Framework 2.0 as shown below. Click on OK.


6. Now see the Solution window where a project has been created in the name “AxWebProject1”. You can rename it.


7. Right click on AxWebUserControl.ascx page in the solution window then click on View Designer as shown above.

8. Now open the Toolbox and find Dynamics Ax tool section. Drag and drop AxDataSource control from Toolbox to the body of the AxWebUserControl.ascx page.


9. Select the AxDataSource1 on the AxWebUserControl.ascx page then assign a DataSet to it from the AxDataSource Tasks dropdown as shown below. Here you need to select SalesInfo DataSet you created in step1.


10. Go to the Toolbox again and add AxGridView control from Toolbox to the AxWebUserControl.ascx form as shown below.


11.Add AxDataSource1 to AxGridView.


12.Now click on Edit Columns… on AxGridView Tasks.


You will get the below field designer.


13. Add those fields you want to display. I added AccountNum, Name, CustGroup and SalesTable!Status. Later on I modified the fields.


14. Now select the AxWebPartPage.aspx in the solution window. Right click on it. Select View Designer.


15. Now drag the AxWebUserControl.ascx page from solution window and drop it to the body of the AxWebPartPage.aspx. Press F5 to execute the page. See the data is being displayed from Ax in the internet explorer.


Grid format(Template) is also available. See step 12. Auto Format is there.


Now your newly created user control is available in Microsoft Dynamics Ax 2009 AOT. To check go to AOT->Web->Web Files->Web Controls->User Controls.


If it's not available in the AOT then you can add it to AOT.
Right click on .ascx control in the Sulution explorer then click on Add to AOT as shown below


Hope this will be helpful for you.
This is Part I.
In Part II I will let you know how to use this .Net made user control within Dynamics Ax 2009 Enterprise Portal (EP).

Monday, January 19, 2009

How to convert Microsoft Dynamics Ax Web form to use ASP.Net-based framework for Ax Enterprise Portal

Disclaimer: There is no warranty for this article. Use at your own risk.
Applied on: Ax 2009 SP1

Prerequisite:
  • You should have Dynamics Ax 2009 SP1 installed with Enterprise Portal
  • Visual Studio 2008 should be installed.
  • You should have basic knowledge of Dynamics Ax, Visual Studio, X++ and C#
  • You should have knowledge of previous version Dynamics Ax Enterprise Portal

This article explains:
  • How to convert Microsoft Dynamics Ax Web form to use ASP.Net-based framework for Ax Enterprise Portal.
  • How to use the Web Form Converter class.
  • How to convert Enterprise Portal Content.
  • How to convert a Web form to user control.
Enterprise Portal for Microsoft Dynamics AX 2009 uses a new framework based on ASP.NET.
User Controls created by using this framework are the primary method for adding functionality to Enterprise Portal. Visual Studio is used to develop or customize User Controls.

In earlier versions of Dynamics AX Enterprise Portal, Web forms and Web controls were the primary method to provide functionality. While Web forms and Web controls are still supported, but Microsoft recommends that any new development for Ax Enterprise Portal to be done with Visual Studio and the ASP.NET-based framework.

If you have created Web forms for an earlier version of Dynamics AX Enterprise Portal, you can convert them to use the new ASP.NET-based framework. A Web Form Converter class is available that can take an existing Web form and convert it into components that can be used with the new Enterprise Portal framework.

To convert a Web form to use the ASP.NET-based framework for Enterprise Portal, you must first add the SysEPWebFormConverter class to your Microsoft Dynamics AX installation. Then you will use methods in this class to perform the conversion.

The SysEPWebFomConverter class contains several methods that are used when you convert a Web form from an earlier version of Enterprise Portal to the components used with the ASP.NET-based framework. You can find the codes of this class from MSDN or you can download the XPO of this class from here. Download this zip file and extract it. Import the extracted XPO file to your application [Note: Applied on Ax 2009 SP1].

To add the SysEPWebFormConverter class
  1. If you use the MSDN code then instructions are there how to do it.
  2. If you download the above said zip file then extract the zip file.
  3. Open your Microsoft Dynamics AX application, open the AOT.
  4. Click the Import button to open the Import form.
  5. Click Browse and select the SharedProject_SysEPWebFomConverter.xpo file that you extracted.
  6. Click OK to start the import process. The class will be added to the AOT.
How to using the Web Form Converter Class
To use the Web Form Converter class, you will specify which Web forms you want to convert.
  1. In the AOT, expand the Classes node.
  2. Locate the SysEPWebFormConverter class. Expand the node for this class.
  3. Right-click the getFormsToConvert method for the class, and then click Edit.
  4. In the script for this method, specify the Web forms that you want to convert. Replace WebForm1 and WebForm2 with the names of the Web forms to be converted. If necessary, add more lines for additional Web forms.
  5. Click Save to save the changes.
  6. In the AOT, right-click the main method for the class, and then click Edit. This is the main code that performs the conversion. It retrieves the list of Web forms to convert, performs the conversion, and then adds the resources that were created to a new project.
  7. Specify the name of the project to be created. By default, the project created will be named WebForm_Conversion. You can change this name if needed.
  8. Click Save to save any changes to the script.
  9. Right-click on the SysEPWebFormConverter class and click on Open to perform the conversion. The new project will be displayed that contains the new resources that were created.
  10. To use the new Web Controls that were created, you must deploy them to the Enterprise Portal server. In the AOT, expand the Web node, and then expand the Web Files node. Right-click the Web Controls node, and then click Deploy.
  11. After the conversion is complete, you should verify that the new components are working correctly.

To view a new User Control in Enterprise Portal, add a Dynamics User Control Web part to an Enterprise Portal page as add Dynamics Web Form Web part. Select the new User Control as the managed content item to display.

To view a User Control in Visual Studio, create a new project as described below:
  1. Start Visual Studio.
  2. In the File menu, click New, and then click Web Site.
  3. In the New Web Site window, select .NET Framework 2.0 as the framework version to use.
  4. Set the Location to File System and the Language to Visual C#.
  5. Choose Dynamics AX Web Project as the template to use. If you do not see this project template, be sure that you have the Enterprise Portal Tools installed.
  6. Specify the name and location of the folder where you want to store the files for the Web project.
  7. Click OK to create the Web project.
  8. If a dialog box displays asking whether to upgrade the Web site to the .NET Framework version 3.5, click No.
  9. The Web Form Converter provides a starting point for converting Web forms to User Controls for Ax Enterprise Portal. You may have to use Visual Studio to modify the User Controls that were created by the conversion to achieve the results that you want.
Hope this article is helpful for you.
I will post in a separate article how to modify a user control for Ax Enterprise Portal.

Tuesday, January 6, 2009

When you click the ellipsis button in the URL property of AOT URL in Microsoft Dynamics AX 4.0: Error message you get "Error in URL property error"

When you work on Microsoft Dynamics AX 4.0 Enterprise Portal, sometimes you get/receive an error message 'Error in URL property error' or 'Error: Development site is not found in the EPParameters table' in the infolog dialog box, if you click the ellipsis (...) button in the URL property of an URL in the Application Object Tree (AOT).

This problem occurs if the URL is used for the enterprise portal.
Actually there would be a web folder issue on the IIS server. To get out of this issue, a knowledge base article 'Software Update for Web Folders (KB907306)' is available on Microsoft website. To download this click here.

In the above mentioned article there is a small downloadable software which you need to download and install to the Microsoft Internet Information Service (IIS) server for the AOT. Install this software to the IIS client computers for the AOT.

Restart the systems you updated and try.

Friday, January 2, 2009

Dynamics Ax 4.0 Enterprise Portal--Windows SharePoint Services does not display the Enterprise Portal templates on the Custom tab.

Disclaimer: There is no warranty on this article. Use at your own risk.

This article is useful:
When the Enterprise Portal templates are not displayed even you deploy the Enterprise Portal software in the Microsoft Dynamics AX 4.0 client.

Windows SharePoint Services does not display the Enterprise Portal templates on the Custom tab.
You don’t receive the message 'DeploySiteDefinition:Success' on Update using Manage Deployments Form.

Cause:

Generally this problem occurs when the current user account does not have access to the file location.
May be Windows SharePoint Services 2.0 and Windows SharePoint Services 3.0 both are installed on the server.
May be the Windows SharePoint Services 3.0 is installed with an additional language package.

To solve this problem

1) you need to download a knowledge base update from Microsoft website. To download this extranet/partnersourse access is required.
Click here to down load.

2) Save the down loaded file in the 1033 folder of your installed WSS:

The location would be
[Root drive:]\ProgramFiles\Common Files\Microsoft Shared\web server extensions\12\TEMPLATE\1033

3) Extract the down loaded file, and then copy the Webtempaxsitedef.xml file to the folders below:
[Root drive:]\ProgramFiles\Common Files\Microsoft Shared\Web server extensions\12\TEMPLATE\SiteTemplates\XML
[Root drive:]\ProgramFiles\Common Files\Microsoft Shared\web server extensions\12\TEMPLATE\1033\XML

4) Open the Ax Application then press Ctrl + D to open the AOT.

5) Go to Web node then Web Files, click on Site Definitions, and then locate the site definition file for the language that is installed. For example, the site definition file for US-EN is AxSiteDef_1033_xip.


6) Right-click the site definition file, and then click Deploy.

7) Restart the IIS.


Now it should work.
For more information you can visit Microsoft website extranet/partnersourse access is required.

Wednesday, April 16, 2008

How to write a web lookup method in X++ (Dynamics Ax)

This article is for those who has basic knowledge of Dynamics Ax (Axapta).
To write this method I used Ax 3.0

Prerequisite: You should have Ax 3.0 Enterprise Portal (EP) installed and license for EP development.

1. Open your Ax application then AOT.

2. Create a new table and rename it as you wish (I used a name "WebLookUpTable") and add three fields to it as shown below:


3. Now go to Methods node of the table you just created and add a new method.

4. Rename the method "webLookUpTableTest" or as you wish. Your method now is a void type. Add "client static" before void key work.

5. Now add the following lines to your method.

client static void webLookUpTableTest()
{
webTableLookup webTableLookup;
Query query;
QueryBuildDataSource queryBuildDataSource;
;

webTableLookup = webTableLookup::newParameters(tableNum(WebLookUpTable));
webTableLookup.addLookupfield(fieldNum(WebLookUpTable, ProfileId),true);
webTableLookup.addLookupfield(fieldNum(WebLookUpTable, Name));
webTableLookup.addLookupfield(fieldNum(WebLookUpTable, Phone));
query = new Query();

queryBuildDataSource = query.addDataSource(tableNum(WebLookUpTable));

webTableLookup.parmQuery(query);
webTableLookup.run();

}

5. Browse your newly created table and create some data in the table.

6. Now your table and web lookup method is ready. You can use it on your existing web form or create a new web form to test it. I used a new web form.

7. To create a new web form go to Web node of AOT then Web Forms. Right click on Web Forms node, on context menu click on New Web Form. Give a name to this form if you wish. Add a WebEdit control to the web form. Go to the Methods node of the WebEdit control and select then right click on it and select Override Methods then "lookup" method.

8. Double click on the lookup method and add "WebLookUpTable::webLookUpTableTest();" after super().

Your web form will look like:


9. Right click on the WebEdit control and click on Properties. Set "Custom" for LookupMethod property.

10. Create a menu item for this web form and add it to a web menus wherever you want. I added it to EPSalesHome->Common tasks->Lookup test.


11. Save your entire customization and run your EP. Browse the web form you added and see the control on that form. A lookup button will be available on this control.


[control on web form]


[Lookup form]


In the above lookup method, you are using "webTableLookup" class to crate lookup. The Query and QueryBuildDataSource have been used to set data data source to web lookup form.

webTableLookup.addLookupfield(fieldNum(WebLookUpTable, ProfileId),true);

In the above line true has been passed because of return value. It means the selected ProfileId to be returned to the WebEdit control.